Include our sample stylesheet, in the <head>
of your page:
<link rel="stylesheet" href="//www.radiojar.com/wrappers/api-plugins/v1/css/show-profile.css">
Or download it and tweak it to your liking.
Include the following code at the point in your web page where you want to display the show:
<div id="rjp-show"></div>
<script id="rjp-show-templ" type="text/html">
    <div class="item-show" data-id="<%= show.utc_from %>" style="background-image: url(//www.radiojar.com/content/shows/<%= show.key %>/cover/?resize=cover_small)">
        <div class="item-status">
    	   <% if(typeof show.schedules!='undefined') { %>
		<% if( RJP.findNextEventofSchedules(show.schedules)!=null) { %>
			<% if(RJP.isNow(show)) { %>
      				<span class="item-onair">On air now</span>
			<% } %>
		<% } %>
	   <% } %>
         </div>
	<div class="item-hostdjs">
            <% for (var i=0;i<show.host_profiles.length;i++){ %>
              <a class="item-dj" title="<%= show.host_profiles[i].dj_info.nickname %>">
	             <div class="content">
	                <img class="item-thumb" src="//www.radiojar.com<%= show.host_profiles[i].dj_info.image_url %>" />
	             </div>
           	</a>
            <% } %>
        </div>
       <div class="overlay">
           <div class="content">
	    <% if(show.schedule){ %>
               <div class="item-hoststation">
                   <a class="item-station preventDefault" >
                    	<img class="item-thumb" src="//www.radiojar.com/content/stations/<%= show.schedule.station %>/image/?resize=60x60">
                 </a>
                </div>
	    <% } %>
                   <a class="item-showinfo">
	                <h4 class="item-name"><%= show.title %></h4>
	                <h5 class="item-tagline"><%= show.tagline %></h5>
		          <% if(show.schedule){ %>
		             	<span class="item-schedule">
	                	   <span class="item-label"><%= RJP.formatScheduledText(show.schedule) %></span>
	            		</span>
			  <% } %>
        	   </a>
             </div>
	 </div>
    </div>
</script>
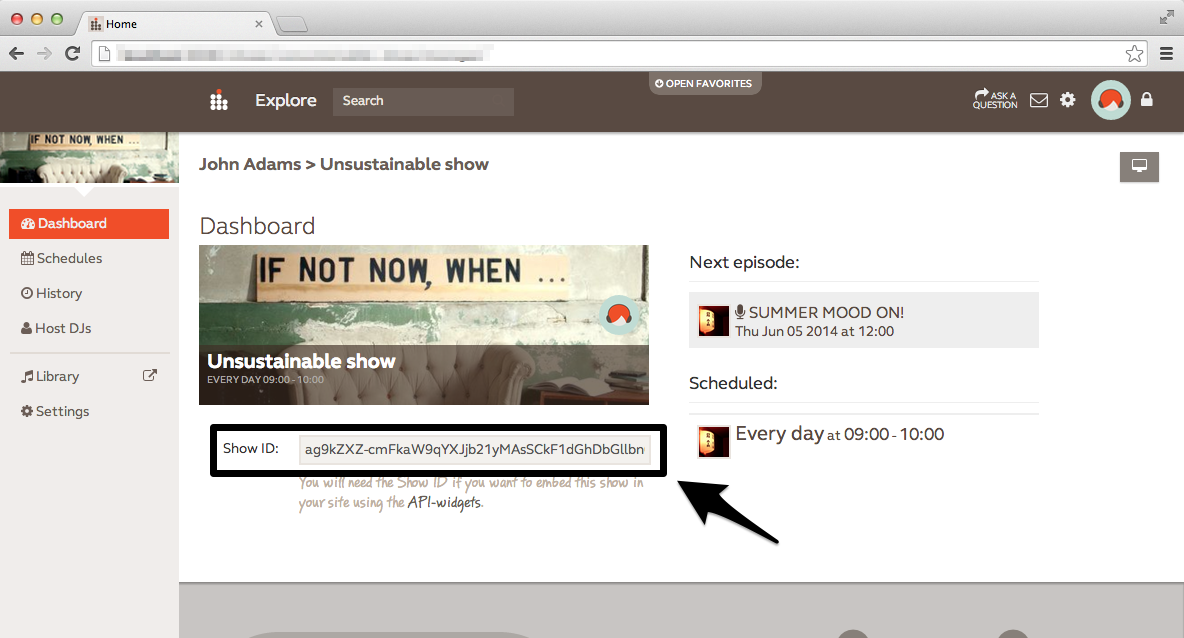
 Include the following code just before the closing body tag. Instead of the id used as an example, use your show's id. You can find the show's id in the management page of your show (check out the screenshot to the right for the exact location).
<script type="text/javascript" src="//www.radiojar.com/wrappers/api-plugins/v1/radiojar-min.js"></script>
<script>
rjq('#rjp-show').radiojar('show', {
    id: "ag1zfnJhZGlvamFyY29tckALEgpBdXRoQ2xpZW50GICAgICA8IsKDAsSDlN0YXRpb25Qcm9maWxlGKGECQwLEgtTaG93UHJvZmlsZRj5ihkMogEDZGV2"
});
rjq('#rjp-show').off('rj-show-on-air');
rjq('#rjp-show').on('rj-show-on-air', function (event) {
	// When the show is on air this event is triggered
});
</script>